Archive
Microsoft Active Directory Topology Diagrammer
Okay… so here’s a tool which’s not that common but actually deserves some attention.
The ADTD utility is a superb small tool which’s really helpful in the event you’re assigned a task at a customer who has no idea where the documentation of their AD DS is or if they even got such.
ADTD will give you the possibility to make a diagram of your Active Directory Topology including Exchange specific details. You’ll also get the possibility to add information about domains, sites, OU’s, GPO objects (including the names and where they’re linked in the OU hierarchy), servers, DFS-R and quite a few other things.
If need be it can even draw partial details of your environment like information regarding a specific domain or site.
Prerequires
- First of all you need to grab a copy of Visio 2003 or newer and install it.
- Secondly go to the link in the bottom of this article and download and install the ADTD utility.
Main Window
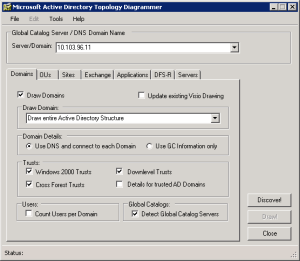
Once fired up, you’ll be met with the application window as shown in Figure 1.
In the Server/Domain textbox you need to enter an IP address of a Global Catalog DC or the domain name.
When ADTD launches it’s initially placed at the first of the seven tabs, which contain settings regarding Domains.
Domain Tab
- If you wish to get a drawing of your domains you must first check the “Draw Domains” checkbox.
- Then specify which part of the Active Directory structure you wish to have drawn by selecting it in the dropdown box.
- Under “Domain Details” you need to specify from where the ADTD utility needs to gather its information. You can choose either DNS or GC. Personally I recommend going with DNS as a first choice.
- Under “Trusts” you must select what kind of information you wish to gather about incomming and outgoing trusts in your AD DS. Please notice the checkbox for gettings details for trusted AD domains.
- Under “Users” you simply get the ability to count the amount of user accounts currently present in each domain.
Beware that this takes quite some time and may cause ADTD to appear like it’s unresponsive. - Finally “Global Catalog” simply gives you the ability to detect which DC’s are also GC’s.
OUs Tab
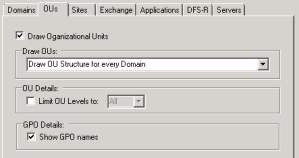
- If you wish to get a drawing of your OU structure you must first check the “Draw Organizational Units” checkbox.
- Then specify which part of the OU structure you wish to have drawn by selecting it in the dropdown box, under the “Draw OUs” section.
- If you want to limit the amount of OU levels you want to dive into, you get the possibility by enabling “Limit OU Levels to:” under “OU Details”.
Leaving it unchecked will render all OU levels. - Under “GPO Details” you get a very cool option to add GPO names to the OU visio drawing.
By enabling this checkbox you will not just get a OU diagram showing that a GPO is linked to a specific OU but you’ll also get the actual GPO name.
Sites Tab
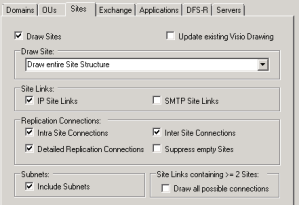
- If you wish to get a drawing of your site structure you must first check the “Draw Sites” checkbox.
- Then specify which part of the site structure you wish to have drawn by selecting it in the dropdown box, under the “Draw Site” section.
- Under “Site Links” you need yo specify if you want to check for (and if found then draw) IP and SMTP Site Links.
Normally you’ll be fine with having only “IP Site Links” checked. - Under “Replication Connections” you can specify if you want both intra- and intersite connections added to the drawing.
You also get to specify whether you want more details or not by checking the “Detailed Replication Connections”.
Finally you have the possibility to leave empty sites out of the drawing by checking the “Suppress empty Sites”. - Under “Subnets” you get the option to include information about subnets at each site.
- Under “Site Links containing >=2 Sites” you can select to have all possible connections drawn.
Whether you need this or not is probably based upon whatever problem you’re currently trying to solve.
Exchange Tab
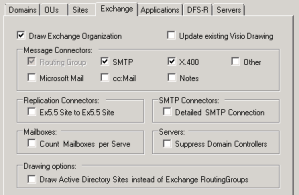
- If you wish to get a drawing of your Exchange structure you must first check the “Draw Exchange Organization” checkbox.
- Under “Message Connectors” you must specify the connector types you wish to include in the drawing.
Normally you can probably do with having just SMTP and X.400 selected but there’s a few other interresting entries you might need in your situation i.e Lotus Notes Connectors if Lotus Notes is deployed in the environment. - Under “Replication Connectors” you’ll find the possibility to include Exchange 5.5 site to site connectors.
You only need this if you got Exchange 5.5. - Under “SMTP Connectors” you can specify to get detailed informations regarding the SMTP Connectors.
Whether you need this or not depends mostly on your current situations. - Under “Mailboxes” you’ll get an option for counting the mailboxes at each Exchange Server.
Beware that this takes quite some time and may cause ADTD to appear like it’s unresponsive. - Under “Servers” you get the option to “Suppress Domain Controllers”. Selecting this will display ONLY Exchange Servers at the Exchange visio drawing.
- Finally there’s a “Drawing options” section where you’ll get the possibility to select whether you want Exchange servers listed in Exchange RoutingGroups or in AD Sites.
Whether you want the former or latter depends mostly on what you’re currently trying to accomplish.
Beware that this option takes quite some time and may cause ADTD to appear like it’s unresponsive.
Applications Tab
- If you wish to get a drawing of your Application Directory Partitions you must first check the “Draw Application Partitions” checkbox.
- Then specify which part of the application partition structure you wish to have drawn by selecting it in the dropdown box, under the “Draw Application Partitions” section.
If you’re drawing these visio documents because you need some detailed informations regarding an AD DS environment, I’d recommend that you draw the entire application partitions structure, since you’ll be able to quickly identify whether or not you have more applications partitions than the default “ForestDNSZones” and “DomainDNSZones”.
DFS-R Tab
- If you wish to get a drawing of your DFS-R (Distributed File System Replication) structure you must first check the “Draw DFS Replication” checkbox.
- Then specify which part of the Active Directory structure you wish to have drawn by selecting it in the dropdown box, under the “Draw DFS Replication” section.
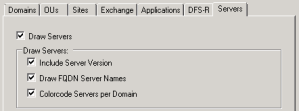
Servers Tab
- If you wish to get a drawing of your Domain Controllers you must first check the “Draw Servers” checkbox.
This will not draw anything else than DCs. - Then specify which informations regarding your DCs you wish to include in the drawnings by selecting one or more of the checkboxed, under the “Draw Servers” section.
- The “Include Server Version” will include the version of the OS installed at the DC.
- The “Draw FQDN Server Names” will enter server names as Full Qualified Domain Names instead og just their hostname.
- The “Colorcode Server per Domain” will groups DCs in color groups depending on which domain they’re part of.
If you have a Single Domain Forest this option will not give any value for you.
Discover Button
Once you’re satisfied with your selections you simply hit the “Discover!” button
Once the discovering is completed you’ll get a status message like in Figure 8.
Draw!
Now, with the discovering process complete, simply hit the “Draw!” button and wait for the magic to happen.
Visio opens and adds the different components to the canvas, but the drawing is not completed before ADTD says “Drawing Complete!” in the status bar.
The drawings are automaticly saved in the Documents folder of your current user account.
External Links
You can download ADTD by clicking the link below:
Download ADTD
Authentication vs. Authorization
So what’s the difference between these 2 terms? Quite a lot of people, even senior enterprise administrators tend to get this one wrong.
Well let’s try to establish this once and for all:
Authentication is all about checking and validating that a user is who he says he is. Authentication is commonly based upon a username and a password (but from now on and in the future we should all really be heading towards certificates).
To set a daily task to the word “Authentication”, this is really what you do once you logon to the domain at work once you’ve booted up your computer.
Authorization determines wheter a user has access to resources – i.e. on a specific share on the company fileserver.
It involves SAM, ACLs (Access Control Lists) and Kerberos.
So to keep it in a phrase:
“You need to authenticate at a DC to be authorized access to a share”
AD DS Administrative Models
Theory is of course no more than that in an IT world, but every now and then there’s a couple of theoretical terms which are very good to remember.
Since I’m working in an Enterprise company, one of the few here ind Denmark, this is especially important for me to remember.
Please notice that this info is all taken from the Microsoft 70-647 Second Edition Training Kit:
CENTRALIZED ADMINISTRATION MODEL
In the centralized administration model, IT-related administration is controlled by one group.
In this model, all critical servers are housed in one location, which facilitates central backup
and an appropriate IT staff member being available when a problem occurs.
The centralized administration model is typically used in organizations that have one large
central office with a few branch offices. Delegation is by function rather than by geographical
location, and most tasks are allocated to IT staff.
THE DISTRIBUTED ADMINISTRATION MODEL
In the distributed administration model, tasks are delegated to IT in various locations. The
rights to perform administrative tasks can be granted based on geography, department, or
job function. Also, administrative control can be granted for a specific network service such
as DNS or a Dynamic Host Configuration Protocol (DHCP) server. This enables separation of
server and workstation administration without giving nonadministrators the rights to modify
network settings or security. A sound, well-planned delegation structure is essential in the
distributed administration model.
The distributed administration model is commonly used in enterprises that have a number
of large, geographically distributed locations—for example, a multinational organization.
Such organizations typically have several domains or even several forests. Although rights are
delegated to administrative staff on a regional basis, a group of enterprise administrators can
typically perform high-level administrative tasks across domains and across forests.
MIXED ADMINISTRATION MODEL
The mixed administration model uses both centralized and distributed administration. For example,
you could define all security policies and standard server configurations from a central
site but delegate the implementation and management of key servers by physical location.
Administrators can configure servers in their own location but cannot configure servers in
other locations. You can distribute the rights to manage only local user accounts to local
administrators and restricted rights over specific OUs to nonadministrative staff. As with the
distributed administrative model, an enterprise administrators group would have rights in all
locations. This model is used in medium-sized organizations with a few fairly large sites that
are geographically separated but in which the main office wants to keep control of certain
aspects of the operation.
Forest and Domain Functional Levels
A list of the forest functional levels and the features supported in Server 2008 R2.
The list is from the 2nd edition of the Microsoft 70-647 book.
Forest Functional Level and its Features
Windows Server 2000
All default Active Directory features
Windows Server 2003
All default Active Directory features, plus the following features:
■ Support for forest trusts
■ Support for renaming domains
■ Support for linked-value replication, which enables domain controllers to replicate individual property values for objects instead of the complete objects to reduce network bandwidth usage
■ The ability to deploy a read-only domain controller (RODC) that runs Windows Server 2008 or Windows Server 2008 R2
■ Improved Knowledge Consistency Checker (KCC) algorithms and scalability
■ The ability to create instances of the dynamic auxiliary class called dynamicObject in a domain directory partition
■ The ability to convert an inetOrgPerson object instance into a User object instance and the reverse
■ The ability to create instances of the new group types, called application basic groups and Lightweight Directory Access Protocol (LDAP) query groups, to support role-based authorization
■ Deactivation and redefinition of attributes and classes in the schema
Windows Server 2008
All the features available at the Windows Server 2003 forest functional level but no additional features
Windows Server 2008 R2
All the features that are available at the Windows Server 2003 forest functional level, plus the following features:
■ Active Directory Recycle Bin
Domain Functional Level and its Features
Windows 2000
Native All default Active Directory features and the following features:
■ Universal groups for both distribution groups and security groups
■ Group nesting
■ Group conversion, which makes conversion between security groups and distribution groups possible
■ Security identifier (SID) history
Windows Server 2003
All default Active Directory features, all features from the Windows 2000 Native domain functional level, plus the following features:
■ The availability of the domain management tool, Netdom.exe, to prepare for a domain controller rename
■ Update of the logon time stamp
■ The ability to set the userPassword attribute as the effective password on the inetOrgPerson object and user objects
■ The ability to redirect Users and Computers containers
■ Authorization Manager, to store its authorization policies in AD DS
■ Constrained delegation
■ Support for selective authentication
Windows Server 2008
All default Active Directory features, all features from the Windows Server 2003 domain functional level, plus the following features:
■ Distributed File System (DFS) Replication support for SYSVOL
■ Advanced Encryption Services (AES 128 and 256) support for the Kerberos authentication protocol
■ Last Interactive Logon Information
■ Fine-grained password policies
Windows Server 2008 R2
All default Active Directory features, all features from the Windows Server 2008 domain functional level, plus the following features:
■ Authentication mechanism assurance
■ Automatic service principal name (SPN) management for services running on a particular computer under the context of a Managed Service Account when the name or DNS host name of the machine account changes
